
And this is how we made it
Making this video was easier than you might think. But it does take some planning, and a little insight into how interactive videos work.
Let’s go through it step by step, so you can see how easy and fun it is to create interactive videos.
TL;DR (For anyone who doesn’t have the time to read the article)
We recorded the video in Teams, edited it with video editing software in a particular order, uploaded png images as interactive buttons in the Qbrick Interactive Manager and set the click action on those buttons to “jump to time” – which means that clicking on those buttons takes you to another time in the same video.
Step 1: Online Interview
At the time of posting this article, the Covid19 pandemic is still wreaking havoc across the globe. Most of us have had to “make do” with online chat services like Teams or Zoom to keep in touch during the work day.
Thankfully, this gives us an easy way of making video content on the fly. It might even allow you to make videos with people at the office who usually don’t want to “perform” in front of a camera.
Because cameras? They can be scary. But Teams or Zoom calls? That’s something we’ve quickly gotten used to.
So take advantage of this and record an interview with your colleague (at least for this example). Ask them a few simple and fun questions. In this case, I chose:
What’s your favourite food?
What would you take with you to a desert island?
What’s your LEAST favourite movie? (for a bit of controversy)
What are your professional goals at this company?
Depending on what chat service you’re using, the screen recording function looks and works different. This is what it looks like in Teams:

Go to the settings menu within the meeting and click on “Start recording”. The recording will start immediately, and after you’re done you will find the video file in your Microsoft Stream account (accessible through Office365).
And this is how it works in Zoom:

The “record” is visible in the bottom bar at all times, and when you leave the meeting, the video file is saved locally to your computer (Zoom will tell you where).
Step 2: Trimming and planning an interactive video
So now you’re done with your recording and you have the video file.
Now you might want to do some video editing (in whatever video editing software you prefer), to 1) trim out clips where nothing is happening, 2) perhaps hide your own face, if you (the interviewer) don’t want to be seen in the video, 3) place the buttons on screen (optional in this step).
Because I recorded my interview in Teams, half of the screen was taken up by my own profile picture. So I chose to use that space to place all my text information, and – of course – buttons!

Basic layout on the video timeline
So here comes one of the more trickier parts: how to place your clips and in what order.
This is an image showing a basic layout of an interactive video (like the one at the top of this article):
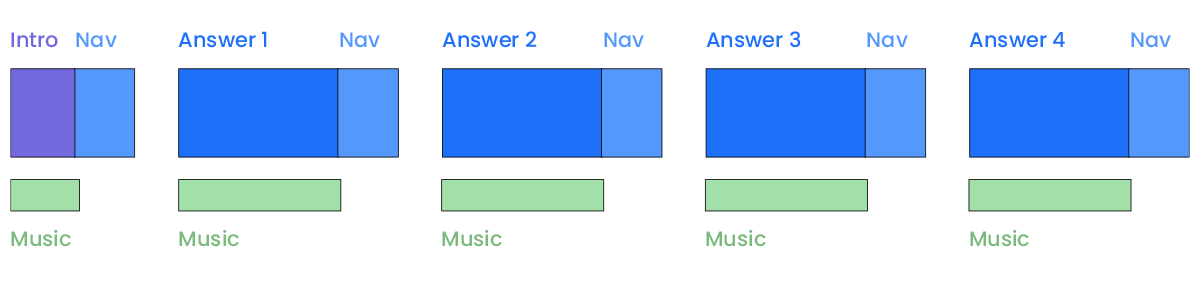
Intro + Navigation
Your video starts with an intro. This intro should be short – and quickly introduce the concept of the video. You want your viewers to get to the interactive part as soon as possible – but not so fast that they don’t understand what they’re supposed to do!
Juska did a great job introducing himself and telling the viewers to choose what they want to know about him. That was all that was needed!
Directly after the intro, you should place the Navigation frame (shortened to “Nav” in the image). If you’re at all confused at what this means, you can go back and look at the image above, where Juska takes up half of the screen, and the other half is full of buttons. That was my Navigation frame.
This frame doesn’t have to stay for very long (which I will explain later on) so you can keep it at just a few seconds long.
TIP:
When the Navigation frame ends, you can keep the screen black until you reach a whole number (for example: 24 seconds). This will help you later on.
Answer + Navigation
Next up comes four different sections of “answer” + “navigation frame”. This makes sure that whenever your viewer is finished watching the answer to the question, they’re able to navigate to somewhere else in the video.
Go back to look at the image showing the editing layout again if you want to see how this looks on your timeline.
Music
If you want to use music in your video, make sure to choose something that doesn’t overpower the voice of the person in the video.
Let’s look at the editing layout again:
As you can see, the music has to end when the Navigation frame enters. This will be explained further on in the next step.
You can add a “fade out” effect to the song clip and allow it to cross over to the Navigation frame for about 0.5 seconds, but definitely not any longer than that.
Why do we add the buttons in the video editing step? Shouldn’t that be done in the Interactive editor at a later stage?
Good question, reader!
This is completely optional. But if you choose to add the buttons in the video editing step, you can choose how the buttons appear. Like maybe you’re good at After Effects and want to make your buttons POP into existence with cool effects.
It can also be good to add them in at this stage to use as a template for where to place the interactive buttons later.
Step 4: Making it interactive
Let’s step into the Interactive manager in the Qbrick Video Platform.
You will see four different windows here. One with a selection of Interactive elements (or widgets), one with a preview of your video, one with settings and one with your video timeline.
Whatever you want to add to your video, you drag from the “Interactive elements” section to your video (the video preview window). The element will be added at the time that your “time cursor” is at (in the video timeline).

Buttons
You have choices when it comes to making buttons.
Either you use the “Button” element in the “Interactive elements” section. This will allow you to use a standard button design and change the size and color of it (as well as the text, of course).
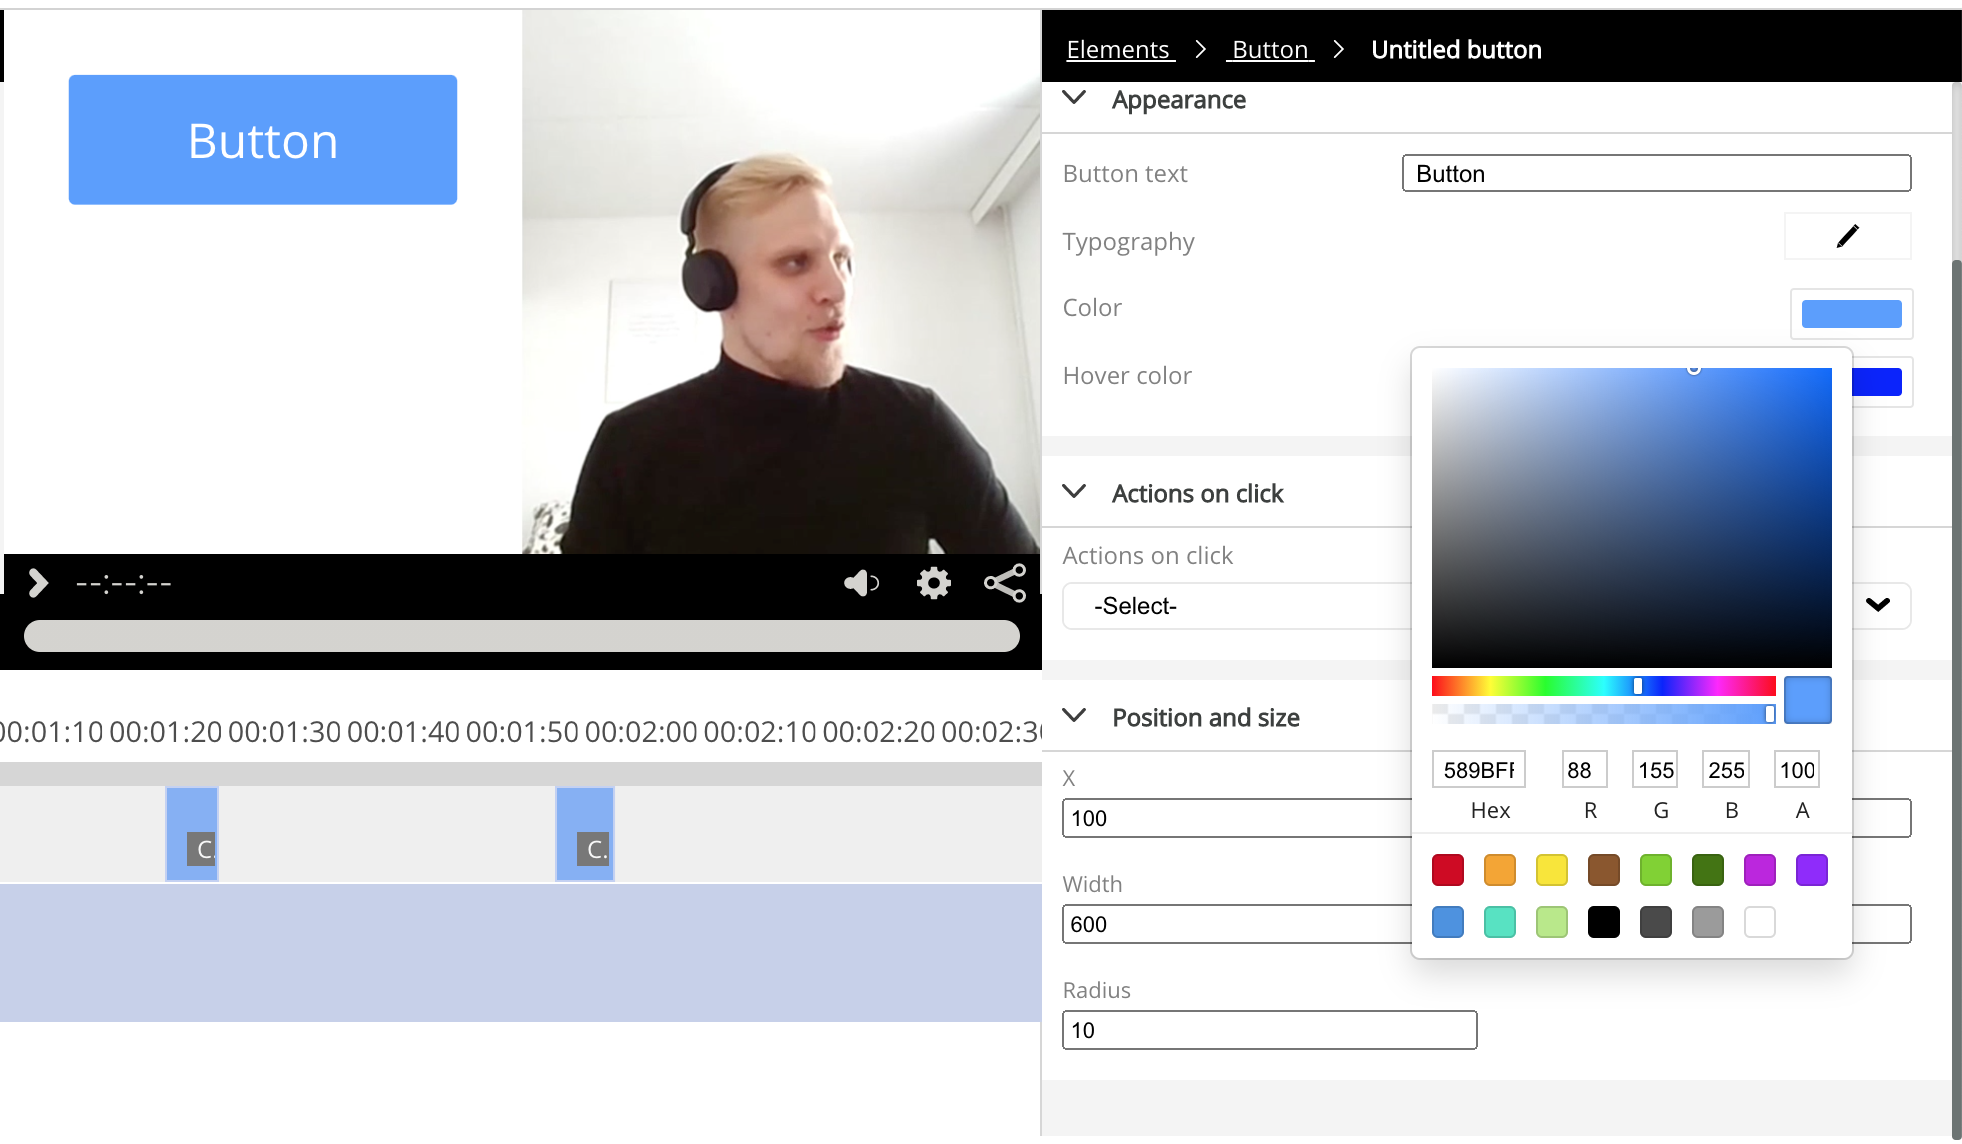
In our example, though, I decided to make custom button designs in photoshop and export them in the .png format (to keep the background transparent).
What to think about when designing your buttons
Having a hover effect on your buttons can be really effective to make sure your viewers understand they can click on them. A “hover effect” basically means that the button’s appearance changes slightly when your mouse cursor hovers over it.
TIP:
Make a hover effect by exporting TWO different versions of the same button. The easiest way to make a hover version is to change the background color to something a bit darker.

Importing your buttons
Because we’ve decided to use a custom image as our buttons this time, we have to drag down the “custom image” element to our video and make sure it appears in the video at the exact time that our Navigation frame enters.
We can do this by grabbing the “time cursor” in the timeline and dragging it until the exact moment the Navigation frame enters, and then click pause. Now if we drag down the “custom image” element, it will be at the right time in the video.
You can also enter the start time of the element manually in the settings menu.
To import our button, we go to the settings menu of our “custom image” (it’s the window to the right) and click on “Choose file” under “Appearance”.
Don’t forget to also upload the hover image!

Navigation frame settings
One important thing that we can’t forget to do, is to go to the settings menu for the “custom image” element, and click on “pause video on entry”. This will make sure that the video pauses when the viewer gets to this point in the video.
If the video doesn’t pause, the navigation frame will go away before the viewer has a chance to click on any of the buttons!

Scale and move them into place
If you’ve already placed the images in your video file, it’s easy to see where the interactive buttons should be placed (and how large they should be).
You have options when it comes to moving and scaling them.
You can click on the button in the video preview window and drag it to where you want it. You can also scale it by dragging on the edges of the blue box that appears when you interact with the button.

If you need to be more precise in your placement, you can go to the settings menu of the button and change the X and Y variables manually.
You can also set exact width and height in pixels.
If you have several buttons in the same element that need to be the same size, this can be helpful!
Action on click
Now we need to say what happens when people click on these buttons!
In this video we’re only using “jump to time” as the click effect. This means that when people click on the buttons, they get sent to a different time in the video.
If you know that the answer for question number 1 starts at 24 seconds into the video, you can enter this number manually. This is why it’s helpful to always place the answer sections at whole numbers in the video.

Do the rest of the video by “copy paste:ing”
Now that you have your first Navigation frame finished, with fully functional interactive buttons – we can copy this element with “ctrl + c” (windows) or “cmd + c” (mac) and paste it with “ctrl + v” (windows) or “cmd + v” (mac) at the next time a Navigation frame appears in your video.
And that’s it folks.

Preview the results
You should check that everything works before saving and posting your video!
Click on the “preview” button in the upper right corner whenever you want to see if it looks and works the way that you want it to.
Make exciting and engaging video content yourself!
Now you know step-by-step how to make an interactive video. All that’s missing is the Interactive Manager to make it happen for real.